| ||||||||
| Cause | ||||||||
| The exception occurs because by default the SUN Web server does not have the write and delete access control rules. Publishing a page to the target server requires write and delete access rights, but the default SUN Web server installation does not grant these two access rights to anyone. | ||||||||
| Resolving the problem | ||||||||
To resolve the problem, proceed as follows:
The problem should now be resolved. |
Wednesday, October 28, 2009
WebSphere Portal site management - publishing pages using a SUN Web server
Monitoring IBM WebSphere Portal caches using IBM Tivoli Performance Viewer
| ||||||||||||||||||||||||||||||||||
| Answer | ||||||||||||||||||||||||||||||||||
A selection of the internal caches of IBM WebSphere Portal can be monitored leveraging the Performance Monitoring Infrastructure (PMI) of IBM WebSphere Application Server. For each cache the Performance Management Infrastructure can report the following metrics:
In order to enable monitoring for the caches exposed to Performance Viewer available in the Integrated Solutions Console of IBM WebSphere Application Server follow the following steps:
Note: Enabling the Performance Monitoring Infrastructure can cause overhead on the IBM WebSphere Portal Server and can cause performance degradation. Enable only necessary statistic stets and test the influence of settings on a test system under load conditions before applying it to production systems. | ||||||||||||||||||||||||||||||||||
Monday, October 26, 2009
JSR286 : Action scope request attribute
Introduction
The core features of any Internet portal are content aggregation from different information sources, web-page personalization and single sign-on. Java portlets act as the building blocks of any J2EE based portal implementation. Java portlets are very similar to Java servlets in many ways. They too are web components, managed by a container, that generate dynamic content. Java Portlet Specification v1.0 (JSR 168) defines the portlet API, container-portlet contract and packaging requirements for Java portlets. The recent Java Portlet Specification 2.0 final draft (JSR 286) facilitates implementing portlets with more advanced capabilities. This article illustrates the use of action scoped request attributes runtime option, which facilitates Java objects created during action phase being accessible during render phase in the form of request attributes.
Portlet Spec v1.0 (JSR 168): Action phase and Request attributes
As defined in the portlet specification v1.0, the portlet lifecycle is split into two distinct phases: Render and Action. When the portlet is rendered in a web page for the first time, it is said to be in render phase in which it returns the initial HTML fragment to be displayed. The portal aggregates this HTML fragment with the fragments of other portlets to form a complete web page. When the user takes an action (form submission for example), it enters action phase in which it processes the request and update its internal state (data).
To reflect the state changes in the user interface, the portlet enters render phase again. This means every action phase is followed by at least one render phase invocation. The portlet might receive additional render requests under various circumstances like when the user refreshes the browser or when he/she makes a request on some other portlet on the same page. This refined request-handling model is required with portlets since they generate only segments of the web page and are hosted along with other portlets in the same page (alternatively, in the servlet model the implementation of service() method takes care of both request processing and response rendering; also it renders the entire web page).
The interface javax.portlet.Portlet abstracts the portlet API and has render() and processAction() methods to represent render and action phases respectively. The portlet container is responsible for invoking these methods as appropriate. During action(), you can call ActionResponse.setRenderParameter() method to set any String values and retrieve the same using RenderRequest.getParameter() in the following render calls. However there is no similar mechanism in case of request attributes. For example, the following portlet will not print the request attribute that is set in processAction().
package samples.actionscope;


import javax.portlet.*;

import java.io.IOException;

import java.util.Date;


public class DateTimePortlet extends GenericPortlet {


   public void doView(RenderRequest req, RenderResponse res) throws IOException, PortletException {

       Object actionAttribute = req.getAttribute("datetime");

       res.getWriter().println("Date Time:" + (actionAttribute != null ? actionAttribute :"Unavailable"));

       res.getWriter().println("
");

       PortletURL u = res.createActionURL();

       res.getWriter().println("Trigger an action.");

       res.getWriter().close();

   }


   public void processAction(ActionRequest req, ActionResponse res) throws PortletException {

       req.setAttribute("datetime",new Date());

   }

}
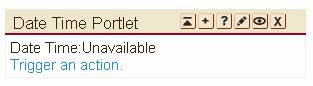
Below is a screenshot of the resultant portlet window after clicking Trigger an action action URL.
With MVC-based web applications, you are very likely to create view objects after request processing, set them as request attributes and use the same for display purposes. Due to the separated action and rendering model, the action request attributes will not be available in any of the view components that are included in the render phase (JSP, Servlet etc).
The only workaround is to use HTTP session (javax.portlet.PortletSession interface) to store and retrieve the attribute explicitly during action and render phases respectively. The problem with this approach is that you, not the container, are responsible for managing session attributes. The attributes are scoped only to the current action request and following render requests and, must be cleaned up when the portlet receives next action request. If you don’t code it properly, you might end up retaining lot of unused objects in the session, thus causing performance issues (IBM Struts Portlet Framework and Apache Struts Portal Bridge also use session as the underlying mechanism). Won’t it be good if the container itself takes care of managing the attributes thus relieving portlet/frameworks from doing the same?
JSR 286 Container Runtime Options
With JSR 286 compliant portlet containers, you can specify additional runtime behavior. The specification defines the following options:
- javax.portlet.escapeXml
- javax.portlet.renderHeaders
- javax.portlet.servletDefaultSessionScope
- javax.portlet.actionScopedRequestAttributes
Support for the first three are optional whereas the last one is required, which is the one we are interested in.
javax.portlet.actionScopedRequestAttributes
As the name implies, the purpose of this runtime option is to provide the portlets with the action scoped request attributes during render phase. You specify this option in the portlet deployment descriptor (portlet.xml) at either portlet level or application level.
Portlet level (only this portlet):
 DateTimePortlet

 Date Time Portlet

 samples.actionscope.DateTimePortlet

 �


     javax.portlet.actionScopedRequestAttributes

     true

     numberOfCachedScopes

     10
Application Level (All the portlets in the application):
 DateTimePortlet

 Date Time Portlet

 samples.actionscope.DateTimePortlet

 �


 �


     javax.portlet.actionScopedRequestAttributes

     true

     numberOfCachedScopes

     10
This specification instructs the portlet container to retain the action request attributes across requests and make them available in all the following render requests. The attributes are valid until a new action occurs or session timeout. Internally, portlet containers use an action scope id to keep track of the action scope, thus associating the attributes with it.
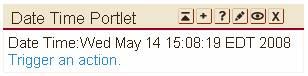
Below is a screenshot of the portlet running the same code with javax.portlet.actionScopedRequestAttributes specified after clicking Trigger an action action URL.
This feature makes the request attributes lifecycle model same as it is in Servlets. It can now be taken advantage to pass form beans back to JSPs in case of errors, resultant objects after processing a request or any object that is used for display. There is no need to manage the session attributes within portlet/framework. Note that the internal implementation mechanism will most likely use an HTTP session only. Hence , best practices related to keeping the session size to the minimum should be followed. For example, you have to design specific view data beans containing only information that is absolutely required (instead of using existing complex objects) to render the web page.
Along the same lines, javax.portlet.servletDefaultSessionScope runtime option can override the visibility of session attributes in the JSP/Servlets. By default, included JSP/Servlets have access to session attributes stored within application scope. Unless the portlet stores session objects at the application scope, they are not visible within JSP/Servlets. This option can be used to change this behavior to portlet scope.
   javax.portlet.servletDefaultSessionScope

   PORTLET_SCOPE
Portlet containers may choose not to support this runtime option, as this is not required according to the v2.0 specification.
Conclusion
As we saw, the Java Portlet Specification 2.0 has added the new container runtime option to support action scoped request attributes. In addition, it includes many features including events, public render parameters, serving resources, and new servlet features like cookies, lifecycle listeners, filters etc thus facilitating porting of existing servlet based applications into portal environment easily. Currently Sun Java System Application Server 9.1 (GlassFish v2) provides a Java Portlet Specification 2.0-compliant container that can be used to develop portlets leveraging new features.
Friday, October 23, 2009
Adding Log4j Logging to a Portlet
System.out is used to put one feel that it give any Performance performance. Now change to try and see Log4j may helpSet out how to write well.
1. First, they need to download log4j before
here http://logging.apache.org/log4j/1.2/download.html.
2. When we have already loaded the file will be much different to many files for extension. Jar.
It is outmostEg. Zip to extract the directory name apache-log4j-1.2.15. c: / apache-log4j-1.2.15/log4j-1.2.15.jar.
3. File log4j-1.2.15.jar. That has to be placed in the path / WEB-INF/lib of Portlet.
4. And then create the file. log4j.properties. By creating this file under this directory. JavaResources / JavaSource.
5. Then change the file. log4j.properties example.
# An example log4j configuration file.
log4j.rootLogger = DEBUG, FILE.
log4j.appender.FILE = org.apache.log4j.FileAppender.
log4j.appender.FILE.File = C: / log / SSOApplicationPortlet.log.
log4j.appender.FILE.Append = true.
log4j.appender.FILE.layout = org.apache.log4j.PatternLayout. log4j.appender.FILE.layout.ConversionPattern = [%-d (yyyy-MM-dd HH: mm: ss)] [% 37c]% 3x -% m% n. Details would be used more.
To write here. http://logging.apache.org/log4j/1.2/manual.html.
6. To see our Portlet When we use Log4j finished we will come running to see.
7. In Class we want to keep or Debug Log Import this into us.
import org.apache.log4j.Logger;
Global variables and then announced to run the following log.
private static Logger logger = Logger.getLogger (name ClassPortlet.class);
And it comes out out outttttt log of each visit Log want to keep this where to use. System.out.println ( "Start doView ()"); / / not used bylogger.debug ( "Start doView ()"); / / Use this to remove.
8.'re Done use Log4j to see if the output is to see the path that we write Set in log4j.properties.
Sunday, October 4, 2009
Steps to remove a damaged Primary Node and assign a new Primary Node to a Portal Cluster
| |||||
| If there is an event that causes issues with the Primary Node in the cluster, such as a failed upgrade, hardware failure, etc, there is a requirement that a Primary Node be identified in the Portal Cluster for maintenance and other tasks. To assign the Primary Node role to another cluster member and remove the damaged member, follow these instructions. 1. Remove Primary node from traffic:
ii. Locate the cluster member you are removing and change the value in the Configured weight column to zero. NOTE: Record the previous value to restore the setting when the upgrade is complete. iii. Click Apply to apply the change. iv. If automatic plug-in generation and propagation is disabled, manually generate and/or propagate the plugin-cfg.xml file to the Web servers.
2. Assign Primary Node classification to a secondary node: Since the Portal Server uses the flag PrimaryNode= for running its configuration tasks, you need to maintain one Primary node in each cluster for that purpose. To Designate a new Primary Node:
3. Remove damaged node from cluster configuration: Given that you may not want to troubleshoot this node, and instead build a new node to add to the cluster, please follow these instructions: WAS 6.0: http://publib.boulder.ibm.com/infocenter/wasinfo/v6r0/index.jsp?topic=/com.ibm.websphere.nd.doc/info/ae/ae/rxml_removenode.html WAS 6.1: http://publib.boulder.ibm.com/infocenter/wasinfo/v6r1/index.jsp?topic=/com.ibm.websphere.nd.doc/info/ae/ae/rxml_removenode.html and remove the affected node from the cluster. 4. (optional) Uninstall/reinstall node and add back to Cluster: Once you have the working cluster with the new Primary Node, you can choose to rebuild this node and add it back to the cluster at a later time as a secondary node. These steps should provide you with a working cluster with a new WebSphere Portal Primary Node. | |||||
To install/configure the personalization sample in WPS 6.1
To install/configure the personalization sample by following these task in WPS 6.1
Step 1: ConfigEngine.bat create-pzndemo-users -DPortalAdminPwd=password
Step 2: ConfigEngine.bat install-pzndemo -DPortalAdminPwd=password -DWasPassword=password
Step 1: ConfigEngine.bat create-pzndemo-users -DPortalAdminPwd=password
Step 2: ConfigEngine.bat install-pzndemo -DPortalAdminPwd=password -DWasPassword=password
Subscribe to:
Posts (Atom)
